持续更新遇到的Bug及需求

MantisBT配置邮件出现发不出去的问题

1
2
3
4
5
2018-05-15 07:58:48 SMTP NOTICE: EOF caught while checking if connected
SMTP Error: Could not authenticate.
SMTP connect() failed. https://github.com/PHPMailer/PHPMailer/wiki/Troubleshooting
Mailer Error: SMTP connect() failed. https://github.com/PHPMailer/PHPMailer/wiki/Troubleshooting
2018-05-15 07:58:48 SERVER -> CLIENT:

解决方法: 在mantisbt/config/config.ini.php(配置好PHPMailer)

1
2
3
4
5
6
7
8
9
10
11
12
13
14
15
16
# --- Email Configuration ---
$g_phpMailer_method = PHPMAILER_METHOD_SMTP; # or PHPMAILER_METHOD_SMTP, PHPMAILER_METHOD_SENDMAIL
$g_smtp_host = 'smtp.qq.com'; # used with PHPMAILER_METHOD_SMTP
$g_smtp_port = '587';
$g_smtp_username = 'xxx@qq.com'; # used with PHPMAILER_METHOD_SMTP
$g_smtp_password = 'password'; # used with PHPMAILER_METHOD_SMTP
$g_administrator_email = 'xxx@qq.com';
$g_webmaster_email = 'xxx@qq.com';
$g_from_email = 'xxx@qq.com'; # the "From: " field in emails
$g_return_path_email = 'xxx@qq.com'; # the return address for bounced mail
$g_from_name = 'Mantis Bug Tracker';
$g_use_phpMailer = ON;
$g_phpMailer_path = './library/phpmailer/';
$g_email_receive_own = OFF;
$g_email_send_using_cronjob = OFF;
$g_smtp_connection_mode = 'tls'; # Can be 'ssl' or 'tls'

Hexo相关问题

加入背景图片

1.设置站点_config.yml

1
post_asset_folder:true

2.安装hexo-asset-image

1
npm install hexo-asset-image --save

3.加入背景图片,主题目录下(themes\next\source\css\_custom\custom.styl)

1
2
3
.header {
background: url("imageurl");
}

4.再重新部署即可

设置字体颜色及checkbox

1
2
3
- [x] <font color=#A52A2A>最近灯光</font>
- [x] <font color=#A52A2A>灯光呈现</font>
- [ ] <font color=#A52A2A>绑定设备</font>
  • 最近灯光
  • 灯光呈现
  • 绑定设备

生成时提示highlight出错

TypeError: Cannot set property ‘lastIndex’ of undefined at highlight (..\node_modules\highlight.js\lib\highlight.js:511:35)

更改站点配置

1
2
3
4
5
highlight:
enable: true
line_number: true
auto_detect: false #改为false
tab_replace:

添加文章更新时间

1.修改/themes/next/layout/_macro/post.swig文件,在<span class="post-time">...</span>标签后添加

1
2
3
4
5
6
7
8
{%if post.updated and post.updated > post.date%}
<span class="post-updated">
&nbsp; | &nbsp; <i class="fa fa-calendar-check-o"></i> &nbsp;{{ __('post.updated') }}
<time itemprop="dateUpdated" datetime="{{ moment(post.updated).format() }}" content="{{ date(post.updated, config.date_format) }}">
{{ date(post.updated, config.date_format) }}
</time>
</span>
{% endif %}

2.修改/themes/next/languages/en.yml

1
2
post:
updated: Updated on

3.如果是中文就更改zh_Hans.yml

1
2
post:
updated: 更新于

4.修改主题配置文件/themes/next/_config.yml,增加一行

1
display_updated: true

参考:hexo添加文章更新时间

minifier压缩

1.安装

1
npm install hexo-all-minifier --save

2.package.json的配置会多出

1
"hexo-all-minifier": "^0.5.2",

3.配置站点_config.yml

1
2
3
4
5
6
7
8
9
10
11
12
13
14
15
16
17
18
19
20
21
22
23
24
25
26
27
# minifier
all_minifier: true
html_minifier:
enable: true
ignore_error: false
exclude:

css_minifier:
enable: true
exclude:
- '*.min.css'

js_minifier:
enable: true
mangle: true
output:
compress:
exclude:
- '*.min.js'

image_minifier:
enable: false
interlaced: false
multipass: false
optimizationLevel: 2
pngquant: false
progressive: false

搜索功能

1.安装

1
npm install hexo-generator-searchdb --save

2.修改站点配置

1
2
3
4
5
search:
path: search.xml
field: post
format: html
limit: 10000

3.修改主题配置

1
2
local_search:
enable: true

表格中换行

1
<br>

表格宽度调整

在themes\next\source\css_custom\custom.styl中加入以下代码

1
2
3
table th:first-of-type {
width: 100px;
}

华丽丽的分割线

分割线的语法只需要三个星号*或者三个小短线-


提交谷歌搜索

1.安装插件

1
npm install hexo-generator-sitemap --save

2.修改站点配置

1
2
sitemap:
path: sitemap.xml

3.source目录下新建robots.txt,内容如下:

1
2
3
4
5
6
7
8
9
10
11
12
13
14
15
User-agent: *

Allow: /
Allow: /archives/
Allow: /categories/
Allow: /tags/

Disallow: /vendors/
Disallow: /js/
Disallow: /css/
Disallow: /fonts/
Disallow: /vendors/
Disallow: /fancybox/

Sitemap: http://username.github.io/sitemap.xml

4.重新发布

1
hexo clean & hexo g & hexo d

5.注册账号,添加域名

Google 网站站长

6.测试robots.txt

点击左侧抓取 > robots.txt测试工具,若提示0错误则OK

7.提交站点地图

点击左侧抓取 > 站点地图,右上角添加/测试站点地图

输入sitemap.xml,先点测试,如果没问题的话,再提交。

集成一言

修改themes\next\layout\_layout.swig,在</body>前加入:

1
2
3
4
5
6
7
8
9
10
11
<script type="text/javascript">
$(function(){
$.get('https://v1.hitokoto.cn/?encode=json&charset=utf-8',function(data){
if(data.type == "f" || data.type == "e"){
$('.site-subtitle').html(data.hitokoto)
}else{
$('.site-subtitle').html(data.hitokoto + " - " + data.from)
}
})
})
</script>

这样会导致站点subtitle配置无效

1
2
3
# Site
title: Delme-bat's blog
subtitle: 风吹动窗吹动叶声响,梦在游荡去更远地方,天上的月露出半只角,看地上有个人还睡不着

参考:一言网 Api 接口说明

嵌入视频

1
2
3
4
5
<center>
<video height="450" width="800" src="https://material.io/design/assets/1NulZoBoZiguk5YAo74aNIR-mRGPmxjSV/materialshadow-do.mp4" controls="controls">
your browser does not support the video tag
</video>
</center>

Material surfaces at different elevations cast shadows.


视频来源:https://material.io/design/environment/surfaces.html#properties

Java相关问题

修饰符顺序声明

1
2
3
4
5
6
7
8
9
10
11
12
13
14
15
16
17
18
19
20
21
22
23
24
25
The Java Language Specification recommends listing modifiers in the following order:

1. Annotations

2. public

3. protected

4. private

5. abstract

6. static

7. final

8. transient

9. volatile

10. synchronized

11. native

12. strictfp

gson库json设置别名

com.google.code.gson:gson:2.8.0

1
2
@SerializedName("original_title")
private String originalTitle;

tomcat manager 显示403

修改conf/Catalina/localhost/manager.xml

1
2
3
4
<Context privileged="true" antiResourceLocking="false"
docBase="${catalina.home}/webapps/manager">
<Valve className="org.apache.catalina.valves.RemoteAddrValve" allow="^.*$" />
</Context>

Android相关问题

查看CPU信息

1
adb shell cat /proc/cpuinfo

使用命令安装应用

1
2
adb uninstall 包名
adb install F:\app-release.apk

RecycleView一行多列显示

1
2
GridLayoutManager gridLayoutManager = new GridLayoutManager(mContext,3);
mRecyclerView.setLayoutManager(gridLayoutManager);

ImageView.ScaleType

EnumValuesDescription
CENTERCenter the image in the view, but perform no scaling.
CENTER_CROPScale the image uniformly (maintain the image’s aspect ratio) so that both dimensions (width and height) of the image will be equal to or larger than the corresponding dimension of the view (minus padding).
CENTER_INSIDEScale the image uniformly (maintain the image’s aspect ratio) so that both dimensions (width and height) of the image will be equal to or less than the corresponding dimension of the view (minus padding).
FIT_CENTERScale the image using Matrix.ScaleToFit.CENTER
FIT_ENDScale the image using Matrix.ScaleToFit.END.
FIT_STARTScale the image using Matrix.ScaleToFit.START.
FIT_XYScale the image using Matrix.ScaleToFit.FILL.
MATRIXScale using the image matrix when drawing.

https://developer.android.com/reference/android/widget/ImageView.ScaleType

gradle build scan

将构建扫描发布到scans.gradle.com 将此数据传输到Gradle的服务器。

在Terminal窗口输入gradlew build --scan
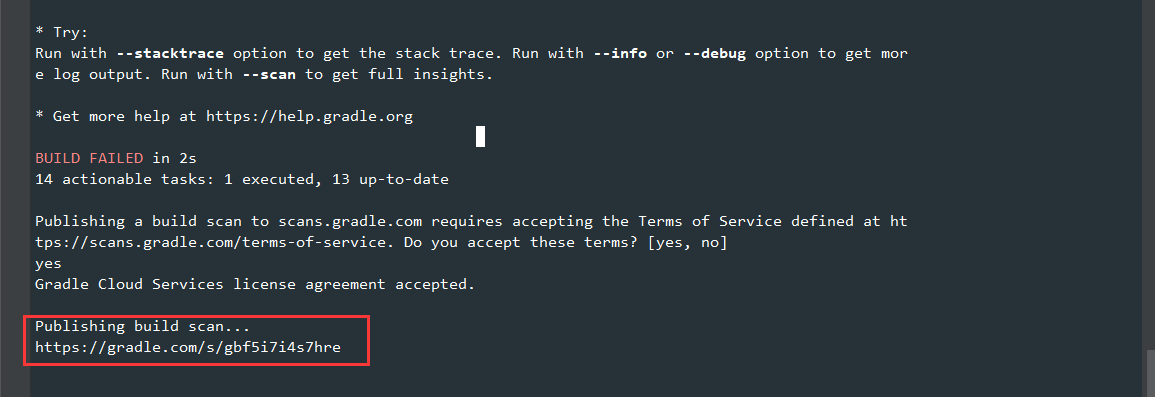
build scan

打开链接,提示输入邮箱验证.

https://scans.gradle.com/

Spinner 设置字体颜色

定义spinner_item.xml:

1
2
3
4
5
6
7
8
9
10
11
<?xml version="1.0" encoding="utf-8"?>

<TextView
xmlns:android="http://schemas.android.com/apk/res/android"
android:layout_width="match_parent"
android:layout_height="wrap_content"
android:textSize="20sp"
android:gravity="left"
android:textColor="#FF0000"
android:padding="5dip"
/>

代码中使用:

1
2
3
4
5
6
Spinner spinner = view_custom.findViewById(R.id.spi_change_sth);
ArrayAdapter<CharSequence> adapter = ArrayAdapter.createFromResource(activity,
R.array.change_sth,
R.layout.spinner_change_sth);
adapter.setDropDownViewResource(android.R.layout.spinner_item);
spinner.setAdapter(adapter);

参考:https://stackoverflow.com/questions/4880413/text-color-of-a-closed-spinner

ProgressBar设置颜色

drawable/progress_bar.xml

1
2
3
4
5
6
7
8
9
10
11
12
13
14
15
16
17
18
19
20
21
22
23
24
25
<?xml version="1.0" encoding="utf-8"?>
<layer-list xmlns:android="http://schemas.android.com/apk/res/android">
<item android:id="@android:id/background">
<shape>
<corners android:radius="5dip" />
<gradient
android:centerColor="@color/colorProgressBg"
android:endColor="@color/colorProgressBg"
android:startColor="@color/colorProgressBg" />
</shape>
</item>


<item android:id="@android:id/progress">
<clip>
<shape>
<corners android:radius="5dip" />
<gradient
android:endColor="@color/colorProgress"
android:startColor="@color/colorProgress" />
</shape>
</clip>
</item>

</layer-list>

ProgressBar:

1
2
3
4
5
6
7
<ProgressBar
android:id="@+id/pb_loading"
style="?android:attr/progressBarStyleHorizontal"
android:layout_width="match_parent"
android:layout_height="3dp"
android:max="100"
android:progressDrawable="@drawable/progress_bar"/>

参考:https://stackoverflow.com/questions/18800290/how-to-change-progressbar-color

Toolbar中PopuMenu菜单显示位置

1
2
3
4
5
6
7
8
9
<resources>
<style name="AppTheme" parent="AppTheme.Base">
<item name="actionOverflowMenuStyle">@style/OverflowMenuStyle</item>
</style>

<style name="OverflowMenuStyle" parent="Widget.AppCompat.PopupMenu.Overflow">
<item name="overlapAnchor">false</item>
</style>
</resources>

修改Toolbar右上角三个圆点的颜色

1.第一种方式,修改android:textColorSecondary,辅助的文字颜色.

1
2
3
4
5
<resources>
<style name="AppTheme" parent="AppTheme.Base">
<item name="android:textColorSecondary">@color/colorTextSecondary</item>
</style>
</resources>

2.推荐的方式,修改actionOverflowButtonStyle.

1
2
3
4
5
6
7
8
9
<style name="AppTheme" parent="AppTheme.Base">
<item name="actionOverflowButtonStyle">@style/OverflowButtonStyle</item>
</style>

<style name="OverflowButtonStyle" parent="android:style/Widget.Holo.Light.ActionButton.Overflow">
<item name="android:src">@drawable/ic_more_vert_white_24dp</item>
<item name="android:background">?android:attr/actionBarItemBackground</item>
<item name="android:contentDescription">@null</item>
</style>

设置debug签名信息

在模块的 build.gradle中设置

1
2
3
4
5
6
7
8
9
10
11
12
13
14
15
16
17
18
19
20
21
22
23
24
25
26
android {

signingConfigs {
release {
keyAlias 'keyAlias'
keyPassword 'android'
storePassword 'android'
storeFile file('F:/key.keystore')
}
}

buildTypes {
release {
minifyEnabled false
proguardFiles getDefaultProguardFile('proguard-android.txt'), 'proguard-rules.pro'

debuggable true
signingConfig signingConfigs.release
}

debug {
signingConfig signingConfigs.release
}
}

}

如果团队协作开发或者将代码开源,那么应当将此敏感信息从构建文件中移出,以免被其他人轻易获取。

1.在项目的根目录下创建一个名为 keystore.properties 的文件。

1
2
3
4
storePassword=myStorePassword
keyPassword=mykeyPassword
keyAlias=myKeyAlias
storeFile=myStoreFileLocation

2.在模块的 build.gradle 文件中,于 android {} 块的前面添加用于加载 keystore.properties 文件的代码

1
2
3
4
5
6
7
8
9
10
11
12
13
14
15
...

// Create a variable called keystorePropertiesFile, and initialize it to your
// keystore.properties file, in the rootProject folder.
def keystorePropertiesFile = rootProject.file("keystore.properties")

// Initialize a new Properties() object called keystoreProperties.
def keystoreProperties = new Properties()

// Load your keystore.properties file into the keystoreProperties object.
keystoreProperties.load(new FileInputStream(keystorePropertiesFile))

android {
...
}

3.修改模块 build.gradle 文件的 signingConfigs 块

1
2
3
4
5
6
7
8
9
10
11
android {
signingConfigs {
config {
keyAlias keystoreProperties['keyAlias']
keyPassword keystoreProperties['keyPassword']
storeFile file(keystoreProperties['storeFile'])
storePassword keystoreProperties['storePassword']
}
}
...
}

现在可以将 keystore.properties 从源代码控制系统中移除。

参考: 签署您的应用 | Android Developers

打开通知授权界面

1
2
Intent intent = new Intent("android.settings.ACTION_NOTIFICATION_LISTENER_SETTINGS");
startActivity(intent);

FlycoTabLayout设置未读数量,位置有偏差

1
2
3
4
5
6
7
8
9
10
11
12
13
14
15
16
int tabCount = 3;

DisplayMetrics dm = getResources().getDisplayMetrics();
float tabWidth = dm.widthPixels / dm.density / tabCount;

mTabLayout.setTabWidth(tabWidth);
mTabLayout.setTabPadding(0);

mTabLayout.showMsg(0, 100);
mTabLayout.setMsgMargin(0, 5, 5);

mTabLayout.showMsg(1, 100);
mTabLayout.setMsgMargin(1, 5, 5);

mTabLayout.showMsg(2, 100);
mTabLayout.setMsgMargin(2, 5, 5);

参考:https://github.com/H07000223/FlycoTabLayout/issues/24

androidTest与test包的区别

本地单元测试(src/test/java)

这些测试在计算机的本地 Java 虚拟机 (JVM) 上运行。 当您的测试没有 Android 框架依赖项或当您可以模拟 Android 框架依赖项时,可以利用这些测试来尽量缩短执行时间。

仪器测试(src/androidTest/java)

这些测试在硬件设备或模拟器上运行。 这些测试有权访问 Instrumentation API,让您可以获取某些信息(例如您要测试的应用的 Context), 并且允许您通过测试代码来控制受测应用。 可以在编写集成和功能 UI 测试来自动化用户交互时,或者在测试具有模拟对象无法满足的 Android 依赖项时使用这些测试。

来源: https://developer.android.com/studio/test/

Google Play商店更新应用(包名已更改)

只能取消发布,再创建新应用(并且之前的不能删除掉,因为Google支持用户无限制下载)

Google Play商店上架提示,您上传了可调试的APK或Android App Bundle.

您上传了可调试的 APK 或 Android App Bundle。出于安全考虑,您需要先停用 APK 或 Android App Bundle 的调试功能,然后才能在 Google Play 中进行发布。详细了解可调试的 APK 或 Android App Bundle

1.左下角 Build Variants 修改模式为 release

Build Variants

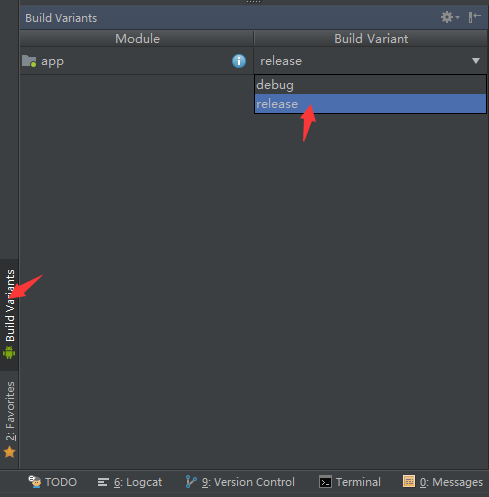
2.gradle 中修改 debuggable 为 false

1
2
3
4
5
6
7
8
9
android {

buildTypes {
release {
debuggable false
}
}

}

3.Build > Generate Signed APK > 重新签名打包

参考:APK上传到play.google - 您上传了可调试的APK错误

Google Play商店上架提示,请将应用的最低目标API级别调整为26.

警告
您的应用目前的目标 API 级别为 19,请将应用的最低目标 API 级别调整为 26,以确保应用基于最新 API 而构建,让安全性和性能达到最佳状态。

自 2018 年 8 月起,新应用的指定目标至少必须是 Android 8.0(API 级别 26)。
自 2018 年 11 月起,应用更新的指定目标必须是 Android 8.0(API 级别 26)。

提示: 更改应用的目标 API 级别。了解详情

将targetSdkVersion 改为26

1
2
3
4
5
android {
defaultConfig {
targetSdkVersion 26
}
}

参考:Google Play 目标 API 等级(targetSdkVersion)重要变更要求

Android8.0开启热点

1
2
3
4
5
6
7
8
9
10
11
12
13
14
15
16
17
18
19
20
21
22
23
24
25
26
27
28
29
30
31
32
33
import android.os.Build;

public class WifiUtil{

public static void turnWifiApOn(WifiManager mWifiManager){
if (Build.VERSION.SDK_INT >= Build.VERSION_CODES.O) {
turnOnHotspot(mWifiManager);
}
}

@RequiresApi(api = Build.VERSION_CODES.O)
private static void turnOnHotspot(WifiManager mWifiManager) {

mWifiManager.startLocalOnlyHotspot(new WifiManager.LocalOnlyHotspotCallback() {
@Override
public void onStarted(WifiManager.LocalOnlyHotspotReservation reservation) {
super.onStarted(reservation);
mReservation = reservation;
}

@Override
public void onStopped() {
super.onStopped();
}

@Override
public void onFailed(int reason) {
super.onFailed(reason);
}
}, new Handler());
}

}

目前会回调onStarted,onStopped和onFailed,但是开启的热点搜不到.需要手动开启热点

Android8.0获取热点信息失败

1
2
3
4
5
6
7
8
9
10
11
12
13
14
W/System.err: java.lang.reflect.InvocationTargetException
W/System.err: at java.lang.reflect.Method.invoke(Native Method)
W/System.err: at android.os.Handler.dispatchMessage(Handler.java:108)
W/System.err: at android.os.Looper.loop(Looper.java:166)
W/System.err: at android.app.ActivityThread.main(ActivityThread.java:7425)
W/System.err: at java.lang.reflect.Method.invoke(Native Method)
W/System.err: at com.android.internal.os.Zygote$MethodAndArgsCaller.run(Zygote.java:245)
W/System.err: at com.android.internal.os.ZygoteInit.main(ZygoteInit.java:921)
W/System.err: Caused by: java.lang.SecurityException: App not allowed to read or update stored WiFi Ap config (uid = 10185)
W/System.err: at android.os.Parcel.readException(Parcel.java:1945)
W/System.err: at android.os.Parcel.readException(Parcel.java:1891)
W/System.err: at android.net.wifi.IWifiManager$Stub$Proxy.getWifiApConfiguration(IWifiManager.java:1792)
W/System.err: at android.net.wifi.WifiManager.getWifiApConfiguration(WifiManager.java:2153)
W/System.err: ... 9 more

暂无解决方法

资源文件中出现百分号处理

1
2
3
4
5
6
7
java.util.UnknownFormatConversionException: Conversion = 'End of String'
at java.util.Formatter$FormatSpecifierParser.peek(Formatter.java:2608)
at java.util.Formatter$FormatSpecifierParser.<init>(Formatter.java:2569)
at java.util.Formatter.parse(Formatter.java:2524)
at java.util.Formatter.format(Formatter.java:2472)
at java.util.Formatter.format(Formatter.java:2426)
at java.lang.String.format(String.java:2626)

xml中的配置,需要显示为正在下载 : 11%

1
<string name="notify_updating_text">正在下载&#160;:&#160;%1$d%</string>

用%%来表示1个%

1
<string name="notify_updating_text">正在下载&#160;:&#160;%1$d%%</string>

参考:关于Android资源文件中出现百分号的问题

重复的包

1
2
Error:Execution failed for task ':app:transformClassesWithJarMergingForRelease'.
> com.android.build.api.transform.TransformException: java.util.zip.ZipException: duplicate entry: org/apache/http/conn/ConnectTimeoutException.class

使用如下命令查看 Dependencies 依赖关系:

1
gradlew -q dependencies app:dependencies --configuration debugAndroidTestCompileClasspath

分析项目依赖:

1
2
3
4
5
6
7
8
9
10
11
12
13
14
15
16
17
18
19
20
21
22
23
24
25
26
27
28
29
30
31
32
33
34
35
36
37
38
39
40
41
42
43
44
45
46
47
48
49
50
51
52
53
54
55
56
57
58
59
60
61
62
63
64
65
66
67
68
69
70
71
72
73
74
75
76
77
78
79
D:\Android\MarkDown>gradlew -q dependencies app:dependencies --configuration debugAndroidTestCompileClasspath

------------------------------------------------------------
Root project
------------------------------------------------------------

No configurations

------------------------------------------------------------
Project :app
------------------------------------------------------------

debugAndroidTestCompileClasspath - Resolved configuration for compilation for variant: debugAndroidTest
+--- com.android.support.test:runner:1.0.2
| +--- com.android.support:support-annotations:27.1.1
| +--- com.android.support.test:monitor:1.0.2
| | \--- com.android.support:support-annotations:27.1.1
| +--- junit:junit:4.12
| | \--- org.hamcrest:hamcrest-core:1.3
| \--- net.sf.kxml:kxml2:2.3.0
+--- com.android.support.test.espresso:espresso-core:3.0.2
| +--- com.android.support.test:runner:1.0.2 (*)
| +--- com.android.support.test.espresso:espresso-idling-resource:3.0.2
| +--- com.squareup:javawriter:2.1.1
| +--- javax.inject:javax.inject:1
| +--- org.hamcrest:hamcrest-library:1.3
| | \--- org.hamcrest:hamcrest-core:1.3
| +--- org.hamcrest:hamcrest-integration:1.3
| | \--- org.hamcrest:hamcrest-library:1.3 (*)
| \--- com.google.code.findbugs:jsr305:2.0.1
+--- com.android.support:appcompat-v7:27.1.1
| +--- com.android.support:support-annotations:27.1.1
| +--- com.android.support:support-core-utils:27.1.1
| | +--- com.android.support:support-annotations:27.1.1
| | \--- com.android.support:support-compat:27.1.1
| | +--- com.android.support:support-annotations:27.1.1
| | \--- android.arch.lifecycle:runtime:1.1.0
| | +--- android.arch.lifecycle:common:1.1.0
| | \--- android.arch.core:common:1.1.0
| +--- com.android.support:support-fragment:27.1.1
| | +--- com.android.support:support-compat:27.1.1 (*)
| | +--- com.android.support:support-core-ui:27.1.1
| | | +--- com.android.support:support-annotations:27.1.1
| | | +--- com.android.support:support-compat:27.1.1 (*)
| | | \--- com.android.support:support-core-utils:27.1.1 (*)
| | +--- com.android.support:support-core-utils:27.1.1 (*)
| | +--- com.android.support:support-annotations:27.1.1
| | +--- android.arch.lifecycle:livedata-core:1.1.0
| | | +--- android.arch.lifecycle:common:1.1.0
| | | +--- android.arch.core:common:1.1.0
| | | \--- android.arch.core:runtime:1.1.0
| | | \--- android.arch.core:common:1.1.0
| | \--- android.arch.lifecycle:viewmodel:1.1.0
| +--- com.android.support:support-vector-drawable:27.1.1
| | +--- com.android.support:support-annotations:27.1.1
| | \--- com.android.support:support-compat:27.1.1 (*)
| \--- com.android.support:animated-vector-drawable:27.1.1
| +--- com.android.support:support-vector-drawable:27.1.1 (*)
| \--- com.android.support:support-core-ui:27.1.1 (*)
+--- com.android.support:design:27.1.1
| +--- com.android.support:support-v4:27.1.1
| | +--- com.android.support:support-compat:27.1.1 (*)
| | +--- com.android.support:support-media-compat:27.1.1
| | | +--- com.android.support:support-annotations:27.1.1
| | | \--- com.android.support:support-compat:27.1.1 (*)
| | +--- com.android.support:support-core-utils:27.1.1 (*)
| | +--- com.android.support:support-core-ui:27.1.1 (*)
| | \--- com.android.support:support-fragment:27.1.1 (*)
| +--- com.android.support:appcompat-v7:27.1.1 (*)
| +--- com.android.support:recyclerview-v7:27.1.1
| | +--- com.android.support:support-annotations:27.1.1
| | +--- com.android.support:support-compat:27.1.1 (*)
| | \--- com.android.support:support-core-ui:27.1.1 (*)
| \--- com.android.support:transition:27.1.1
| +--- com.android.support:support-annotations:27.1.1
| \--- com.android.support:support-compat:27.1.1 (*)
\--- com.android.support:support-annotations:27.1.1

(*) - dependencies omitted (listed previously)

找出重复的包,再exclude掉

1
2
3
implementation('com.squareup.retrofit2:converter-simplexml:' + rootProject.retrofit2Version) {
exclude module: 'stax-api'
}

参考:http://www.paincker.com/gradle-dependencies

Could not find class ‘com.facebook.LoggingBehavior[]’

接入Facebook应用,debug模式打开异常,应用加上签名就好使了.

1
2
3
4
5
6
7
8
9
10
11
12
13
14
15
16
17
18
19
20
21
22
23
24
E/dalvikvm: Could not find class 'com.facebook.LoggingBehavior[]', referenced from method com.facebook.FacebookSdk.<clinit>
W/dalvikvm: VFY: unable to resolve new-array 3830 ([Lcom/facebook/LoggingBehavior;) in Lcom/facebook/FacebookSdk;
W/dalvikvm: VFY: unable to find class referenced in signature (Lcom/facebook/LoggingBehavior;)
I/dalvikvm: Could not find method com.facebook.internal.Validate.sdkInitialized, referenced from method com.facebook.FacebookSdk.getApplicationContext
W/dalvikvm: VFY: unable to resolve static method 9237: Lcom/facebook/internal/Validate;.sdkInitialized ()V
I/dalvikvm: Could not find method com.facebook.internal.Validate.sdkInitialized, referenced from method com.facebook.FacebookSdk.getApplicationId
W/dalvikvm: VFY: unable to resolve static method 9237: Lcom/facebook/internal/Validate;.sdkInitialized ()V
I/dalvikvm: Could not find method com.facebook.internal.Validate.sdkInitialized, referenced from method com.facebook.FacebookSdk.getApplicationName
W/dalvikvm: VFY: unable to resolve static method 9237: Lcom/facebook/internal/Validate;.sdkInitialized ()V
I/dalvikvm: Could not find method com.facebook.internal.Validate.sdkInitialized, referenced from method com.facebook.FacebookSdk.getApplicationSignature
W/dalvikvm: VFY: unable to resolve static method 9237: Lcom/facebook/internal/Validate;.sdkInitialized ()V
I/dalvikvm: Could not find method com.facebook.internal.Validate.sdkInitialized, referenced from method com.facebook.FacebookSdk.getAutoLogAppEventsEnabled
W/dalvikvm: VFY: unable to resolve static method 9237: Lcom/facebook/internal/Validate;.sdkInitialized ()V
I/dalvikvm: Could not find method com.facebook.internal.Validate.sdkInitialized, referenced from method com.facebook.FacebookSdk.getCacheDir
W/dalvikvm: VFY: unable to resolve static method 9237: Lcom/facebook/internal/Validate;.sdkInitialized ()V
I/dalvikvm: Could not find method com.facebook.internal.Validate.sdkInitialized, referenced from method com.facebook.FacebookSdk.getCallbackRequestCodeOffset
W/dalvikvm: VFY: unable to resolve static method 9237: Lcom/facebook/internal/Validate;.sdkInitialized ()V
I/dalvikvm: Could not find method com.facebook.internal.Validate.sdkInitialized, referenced from method com.facebook.FacebookSdk.getClientToken
W/dalvikvm: VFY: unable to resolve static method 9237: Lcom/facebook/internal/Validate;.sdkInitialized ()V
I/dalvikvm: Could not find method com.facebook.internal.Validate.sdkInitialized, referenced from method com.facebook.FacebookSdk.getLimitEventAndDataUsage
W/dalvikvm: VFY: unable to resolve static method 9237: Lcom/facebook/internal/Validate;.sdkInitialized ()V
I/dalvikvm: Could not find method com.facebook.internal.Validate.sdkInitialized, referenced from method com.facebook.FacebookSdk.getOnProgressThreshold
W/dalvikvm: VFY: unable to resolve static method 9237: Lcom/facebook/internal/Validate;.sdkInitialized ()V
W/dalvikvm: VFY: unable to find class referenced in signature (Lcom/facebook/LoggingBehavior;)

Execution failed for task ‘:app:transformClassesWithInstantRunForDebug’

1
2
Execution failed for task ':app:transformClassesWithInstantRunForDebug'
> Failed to find byte code for android/net/wifi/WifiManager$LocalOnlyHotspotCallback

解决方法:打开File > Settings > Build,Execution,Deployment > Instant Run

去掉勾选Enable Instant Run to hot swap code/resource changes on deploy(default enabled)

参考:Error:Execution failed for task :app:transformClassesWithInstantRunForDebug解决方案

NestedScrollView嵌套RecyclerView时滑动不流畅问题的解决办法

1
recyclerView.setNestedScrollingEnabled(false);

参考:NestedScrollView嵌套RecyclerView时滑动不流畅

Glide加载图片出错

1
2
java.lang.OutOfMemoryError: Failed to allocate a 31961100 byte allocation with 16777216 free bytes and 20MB until OOM, max allowed footprint 129449656, growth limit 134217728
java.io.FileNotFoundException: No content provider: http://xxx/xxx.jpg

解决方法:

1
2
3
4
5
6
7
8
9
10
11
12
13
14
15
16
17
18
19
20
21
22
Glide.with(context)
.load(url)
.listener(new RequestListener<Drawable>(){
@Override
public boolean onLoadFailed(@Nullable GlideException e, Object model, Target<Drawable> target, boolean isFirstResource) {
handler.post(new Runnable() {
@Override
public void run() {
Glide.with(context)
.load(url)
.into(iv);
}
});
return false;
}

@Override
public boolean onResourceReady(Drawable resource, Object model, Target<Drawable> target, DataSource dataSource, boolean isFirstResource) {
return false;
}
})
.into(iv);

Generic advice here: https://bumptech.github.io/glide/doc/debugging.html#out-of-memory-errors

Could not find android.arch.core:common:1.1.0

1
2
3
4
5
6
7
8
9
10
11
12
13
14
Error:FAILURE: Build failed with an exception.

* What went wrong:
Could not resolve all files for configuration ':mobile:debugAndroidTestRuntimeClasspath'.
> Could not find common.jar (android.arch.core:common:1.1.0).
Searched in the following locations:
https://jcenter.bintray.com/android/arch/core/common/1.1.0/common-1.1.0.jar

* Try:
Run with --stacktrace option to get the stack trace. Run with --info or --debug option to get more log output. Run with --scan to get full insights.

* Get more help at https://help.gradle.org

BUILD FAILED in 19s

解决方法:

项目根目录调整仓库位置google()在前

1
2
3
4
5
6
7
8
9
10
11
12
13
14
15
16
17
18
19
20
21
22
23
buildscript {
repositories {
google()
jcenter()
maven{url 'https://jitpack.io'}
}
dependencies {
classpath 'com.android.tools.build:gradle:3.1.3'

// NOTE: Do not place your application dependencies here; they belong
// in the individual module build.gradle files
}
}

allprojects {
repositories {
maven {
url "https://maven.google.com"
}
google()
jcenter()
}
}

Drawable has unresolved theme attributes!

1
2
Drawable xxx/ic_navigate_back has unresolved theme attributes! 
Consider using Resources.getDrawable(int, Theme) or Context.getDrawable(int).

解决方法:

1
Drawable upArrow = ContextCompat.getDrawable(mContext,R.drawable.ic_navigate_back);

ContextCompat.getDrawable(Context, int) 代替 getResources().getDrawable(int)

参考: https://github.com/afollestad/material-dialogs/issues/1002

在Fragment中使用StartActivityForResult,RequestCode错乱

1
startActivityForResult(intent, 1);

改为

1
getActivity().startActivityForResult(intent, 1);

Activity返回刷新界面

1.startActivityForResult

1
2
3
4
5
6
private final static int REFRESH_RESULT_REQ = 101;

Intent intent = new Intent();
intent.putExtra("something", "something");
intent.setClass(RefreshActivity.this, SecondActivity.class);
RefreshActivity.this.startActivityForResult(intent, REFRESH_RESULT_REQ);

2.startActivityForResult回调

1
2
3
4
5
6
7
@Override
protected void onActivityResult(int requestCode, int resultCode, Intent data) {
super.onActivityResult(requestCode, resultCode, data);
if (REFRESH_RESULT_REQ == requestCode && resultCode == 0) {
// do something
}
}

Fragment返回刷新界面

重写onResume()

1
2
3
4
5
@Override
public void onResume() {
super.onResume();
// do something
}

Toolbar不能同时显示图片和文字

1
2
3
4
5
6
7
8
9
10
11
12
13
@Override
protected boolean onPrepareOptionsPanel(View view, Menu menu) {
if (menu != null && menu.getClass() == MenuBuilder.class) {
try {
Method m = menu.getClass().getDeclaredMethod("setOptionalIconsVisible", Boolean.TYPE);
m.setAccessible(true);
m.invoke(menu, true);
} catch (Exception e) {
// print error msg.
}
}
return super.onPrepareOptionsPanel(view, menu);
}

xpp3 defines classes that conflict with classes now provided by Android.

1
2
3
Error:Error: xpp3 defines classes that conflict with classes now provided by Android. 
Solutions include finding newer versions or alternative libraries that don't have the same problem
(for example, for httpclient use HttpUrlConnection or okhttp instead), or repackaging the library using something like jarjar. [DuplicatePlatformClasses]

解决方法:在app/build.gradle中添加

1
2
3
4
5
6
7
8
android {
...
configurations {
all {
exclude group: 'xpp3', module: 'xpp3'
}
}
}

参考:https://stackoverflow.com/questions/48488563/gradle-xpp3-error

Trouble processing “javax/xml/XMLConstants.class” in Android

1
2
3
implementation ('com.squareup.retrofit2:converter-simplexml:2.3.0'){
exclude module: 'stax-api'
}

参考:https://stackoverflow.com/questions/17165498/trouble-processing-javax-xml-xmlconstants-class-in-android

接入TBS后,webView拍照上传图片失败

1
2
3
4
5
6
7
8
9
10
11
12
13
14
15
16
17
18
19
20
21
22
23
24
25
26
27
28
29
30
31
32
33
34
35
36
37
38
39
40
41
42
43
44
45
46
47
48
49
50
51
52
53
54
55
56
57
58
59
60
61
62
63
64
65
66
67
68
69
70
71
72
73
74
75
76
77
78
79
80
81
82
83
84
85
86
87
88
89
90
91
92
93
94
95
96
97
98
99
100
101
102
103
104
105

import android.app.Activity;
import android.app.ActivityOptions;
import android.content.Context;
import android.content.Intent;
import android.net.Uri;
import android.view.KeyEvent;
import android.view.View;
import android.view.ViewGroup;
import android.widget.TextView;

import com.tencent.smtt.sdk.ValueCallback;
import com.tencent.smtt.sdk.WebChromeClient;
import com.tencent.smtt.sdk.WebSettings;
import com.tencent.smtt.sdk.WebView;
import com.tencent.smtt.sdk.WebViewClient;

public class WebViewActivity extends Activity{

private ValueCallback<Uri> uploadFile;
private ValueCallback<Uri[]> uploadFiles;

//oncreate...

public void init(){
wvContent.setWebChromeClient(new WebChromeClient() {

// For Android 3.0+
public void openFileChooser(ValueCallback<Uri> uploadMsg, String acceptType) {
WebViewActivity.this.uploadFile = uploadMsg;
openFileChooseProcess();
}

// For Android < 3.0
public void openFileChooser(ValueCallback<Uri> uploadMsgs) {
WebViewActivity.this.uploadFile = uploadMsgs;
openFileChooseProcess();
}

// For Android > 4.1.1
public void openFileChooser(ValueCallback<Uri> uploadMsg, String acceptType, String capture) {
WebViewActivity.this.uploadFile = uploadMsg;
openFileChooseProcess();
}

// For Android >= 5.0
public boolean onShowFileChooser(com.tencent.smtt.sdk.WebView webView,
ValueCallback<Uri[]> filePathCallback,
WebChromeClient.FileChooserParams fileChooserParams) {
WebViewActivity.this.uploadFiles = filePathCallback;
openFileChooseProcess();
return true;
}

@Override
public void onReceivedTitle(WebView view, String title) {
super.onReceivedTitle(view, title);
setTitle(title);
}
});
}

private void openFileChooseProcess() {
Intent i = new Intent(Intent.ACTION_GET_CONTENT);
i.addCategory(Intent.CATEGORY_OPENABLE);
i.setType("*/*");
startActivityForResult(Intent.createChooser(i, "File Chooser"), 0);
}

@Override
public void onActivityResult(int requestCode, int resultCode, Intent data) {

super.onActivityResult(requestCode, resultCode, data);
if (resultCode == RESULT_OK) {
switch (requestCode) {
case 0:
if (null != uploadFile) {
Uri result = data == null || resultCode != RESULT_OK ? null
: data.getData();
uploadFile.onReceiveValue(result);
uploadFile = null;
}
if (null != uploadFiles) {
Uri result = data == null || resultCode != RESULT_OK ? null
: data.getData();
uploadFiles.onReceiveValue(new Uri[]{result});
uploadFiles = null;
}
break;
default:
break;
}
} else if (resultCode == RESULT_CANCELED) {
if (null != uploadFile) {
uploadFile.onReceiveValue(null);
uploadFile = null;
}
if (null != uploadFiles) {
uploadFiles.onReceiveValue(null);
uploadFile = null;
}
}
}

}

Failed to finalize session : INSTALL_FAILED_INVALID_APK: /.. signatures are inconsistent

1
2
3
4
5
6
Installation failed with message Failed to finalize session : INSTALL_FAILED_INVALID_APK: /data/app/vmdl1718624679.tmp/2_dependencies signatures are inconsistent.
It is possible that this issue is resolved by uninstalling an existing version of the apk if it is present, and then re-installing.

WARNING: Uninstalling will remove the application data!

Do you want to uninstall the existing application?

先clean,再重新运行

TBS播放视频

1
2
3
4
mActivity.getWindow().setFormat(PixelFormat.TRANSLUCENT);
if (TbsVideo.canUseTbsPlayer(mContext)) {
TbsVideo.openVideo(mContext, url);
}

TBS报错Didn’t find class “com.tencent.smtt.export.external.interfaces.CorePermissionRequest

1
2
Rejecting re-init on previously-failed class java.lang.Class<com.tencent.smtt.webkit.WebViewChromiumExtension$49>: java.lang.NoClassDefFoundError: Failed resolution of: Lcom/tencent/smtt/export/external/interfaces/CorePermissionRequest$CorePermissionRequestCallback;
Caused by: java.lang.ClassNotFoundException: Didn't find class "com.tencent.smtt.export.external.interfaces.CorePermissionRequest$CorePermissionRequestCallback" on path: DexPathList[[zip file "/data/user/0/com.tencent.mobileqq/app_tbs/core_share/tbs_jars_fusion_dex.jar"],nativeLibraryDirectories=[/data/user/0/com.tencent.mobileqq/app_tbs/core_share, /data/user/0/com.tencent.mobileqq/app_tbs/share/plugins/com.tencent.qb.plugin.videodecode, /system/lib, /vendor/lib]]

WebView监听上下滑动,设置工具栏隐藏

1
2
3
4
5
6
7
8
9
10
11
12
13
14
15
16
17
float y1 = 0;
float y2 = 0;

@Override
public boolean dispatchTouchEvent(MotionEvent event) {
if (event.getAction() == MotionEvent.ACTION_DOWN) {
y1 = event.getY();
} else if (event.getAction() == MotionEvent.ACTION_MOVE) {
y2 = event.getY();
if (y1 - y2 > 50) {
llWVTool.setVisibility(View.GONE);
} else if (y2 - y1 > 50) {
llWVTool.setVisibility(View.VISIBLE);
}
}
return super.dispatchTouchEvent(event);
}

android.os.DeadSystemException:

1
android.os.DeadSystemException: The system died; earlier logs will point to the root cause

Failed to resolve: common

1
2
3
4
5
6
7
8
9
10
11
12
13
14
15
16
17
18
19
buildscript {
repositories {
google()
jcenter()
}
dependencies {
classpath 'com.android.tools.build:gradle:3.0.0'

// NOTE: Do not place your application dependencies here; they belong
// in the individual module build.gradle files
}
}

allprojects {
repositories {
google()
jcenter()
}
}

将google()写在前面

在Fragment中使用MaterialSearchView

1
2
3
4
5
6
7
8
9
setHasOptionsMenu(true);

@Override
public void onCreateOptionsMenu(Menu menu, MenuInflater inflater) {
inflater.inflate(R.menu.search_view, menu);
super.onCreateOptionsMenu(menu, inflater);
final MenuItem item = menu.findItem(R.id.action_search);
searchView.setMenuItem(item);
}

参考:https://github.com/MiguelCatalan/MaterialSearchView/issues/45

输入法将BottomNavigationBar(底部导航栏)顶上去

在应用清单中给当前设置:

1
android:windowSoftInputMode="adjustPan"

参考:https://developer.android.google.cn/guide/topics/manifest/activity-element#wsoft

InnerClass annotations are missing corresponding EnclosingMember annotations.

1
2
3
InnerClass annotations are missing corresponding EnclosingMember annotations. Such InnerClass annotations are ignored.
Message{kind=WARNING, text=InnerClass annotations are missing corresponding EnclosingMember annotations. Such InnerClass annotations are ignored.,
sources=[Unknown source file], tool name=Optional.of(D8)}

解决方法:

1
2
3
4
5
6
7
8
buildTypes {
release {
lintOptions {
checkReleaseBuilds false
abortOnError false
}
}
}

RecyclerView 最后一个item设置paddingBottom

1
2
3
4
5
6
<android.support.v7.widget.RecyclerView
android:id="@+id/recyclerView"
android:layout_width="match_parent"
android:layout_height="match_parent"
android:clipToPadding="false"
android:paddingBottom="15dp" />

参考: https://stackoverflow.com/questions/33754445/margin-padding-in-last-child-in-recyclerview

Git相关问题

切换目录

1
cd /d

Sonar相关问题

“BigDecimal(double)” should not be used

不要使用BigDecimal(double)去构造一个BigDecimal对象,因为double类型在计算机表示方法中并不精确,因此,BigDecimal(double)构造出来的对象很可能不是预期的大小,若一定要使用double类型去构造一个BigDecimal对象,请使用BigDecimal.valueOf方法,该方法先将double转换为String,再通过String构造BigDecimal对象,通常更建议使用public BigDecimal(String val)构造方法。

Noncompliant Code Example

1
2
3
4
double d = 1.1;

BigDecimal bd1 = new BigDecimal(d); // Noncompliant; see comment above
BigDecimal bd2 = new BigDecimal(1.1); // Noncompliant; same result

Compliant Solution

1
2
3
4
double d = 1.1;

BigDecimal bd1 = BigDecimal.valueOf(d);
BigDecimal bd2 = new BigDecimal("1.1"); // using String constructor will result in precise value

see :

Lambdas should be replaced with method references

改成mView::scan

1
2
3
4
5

RxPermissions rxPermissions = new RxPermissions(activity);
rxPermissions
.request(Manifest.permission.CAMERA)
.subscribe(mView::scan);

参考:Intellij - can be replaced with method reference

Jenkins相关问题

Could not find com.android.tools.build:gradle:3.0.1

1
2
3
4
5
6
7
8
9
10
11
12
13
14
15
16
17
18
19
20
21
22
23
24
25
26
27
28
29
30
31
FAILURE: Build failed with an exception.

* What went wrong:
A problem occurred configuring root project 'mokioo'.
> Could not resolve all files for configuration ':classpath'.
> Could not resolve com.android.tools.build:gradle:3.0.1.
Required by:
project :
> Could not resolve com.android.tools.build:gradle:3.0.1.
> Could not get resource 'https://jcenter.bintray.com/com/android/tools/build/gradle/3.0.1/gradle-3.0.1.pom'.
> Could not HEAD 'https://jcenter.bintray.com/com/android/tools/build/gradle/3.0.1/gradle-3.0.1.pom'.
> Connect to jcenter.bintray.com:443 [jcenter.bintray.com/75.126.118.188] failed: Connection timed out: connect
> Could not resolve com.android.tools.build:gradle:3.0.1.
Required by:
project : > com.jakewharton:butterknife-gradle-plugin:8.5.1
> Could not resolve com.android.tools.build:gradle:3.0.1.
> Could not get resource 'https://jcenter.bintray.com/com/android/tools/build/gradle/3.0.1/gradle-3.0.1.pom'.
> Could not HEAD 'https://jcenter.bintray.com/com/android/tools/build/gradle/3.0.1/gradle-3.0.1.pom'.
> Connect to jcenter.bintray.com:443 [jcenter.bintray.com/75.126.118.188] failed: Connection timed out: connect

* Try:
Run with --stacktrace option to get the stack trace. Run with --info or --debug option to get more log output.

* Get more help at https://help.gradle.org

BUILD FAILED in 26s
Build step 'Invoke Gradle script' changed build result to FAILURE
Build step 'Invoke Gradle script' marked build as failure
WARN: Unable to locate 'report-task.txt' in the workspace. Did the SonarScanner succedeed?
归档成品
Finished: FAILURE

提示连接到jcenter超时,在项目build.gradle中添加google()

1
2
3
4
5
6
7
8
9
10
11
12
buildscript {
repositories {
jcenter()
google() //添加
}
dependencies {
classpath 'com.android.tools.build:gradle:3.0.1'

// NOTE: Do not place your application dependencies here; they belong
// in the individual module build.gradle files
}
}

Step ‘Publish JUnit test result report’ failed

1
ERROR: Step 'Publish JUnit test result report' failed: No test report files were found. Configuration error?

没有配置测试报告(XML)

1
app/build/test-results/testDebugUnitTest/*.xml

Execution failed for task ‘:app:transformClassesWithJacocoForDebug’.

1
2
3
4
5
6
7
8
9
10
11
12
13
14
:app:transformClassesWithJacocoForDebug FAILED

FAILURE: Build failed with an exception.

* What went wrong:
Execution failed for task ':app:transformClassesWithJacocoForDebug'.
> There was a failure while executing work items
> java.util.concurrent.ExecutionException: org.gradle.workers.internal.DefaultWorkerExecutor$WorkExecutionException:
A failure occurred while executing com.android.build.gradle.internal.transforms.JacocoTransform$JacocoWorkerAction

* Try:
Run with --stacktrace option to get the stack trace. Run with --info or --debug option to get more log output. Run with --scan to get full insights.

* Get more help at https://help.gradle.org

解决方法:

1
2
3
classpath('com.dicedmelon.gradle:jacoco-android:0.1.2') {
exclude group: 'org.codehaus.groovy', module: 'groovy-all'
}

参考:https://github.com/arturdm/jacoco-android-gradle-plugin/issues/42

java.lang.IllegalStateException: No files nor directories matching ‘app/build/intermediates/classes’

Android Studio 3.3 Canary 2 生成的classes文件夹为app\build\intermediates\javac\debug\compileDebugJavaWithJavac\classes

需要将Jenkins项目配置

1.Execute SonarQube Scanner -> Analysis properties

1
sonar.java.binaries=app/build/intermediates/javac/debug/compileDebugJavaWithJavac/classes

2.Record JaCoCo coverage report -> Path to class directories (e.g.: /target/classDir, /classes)

1
app/build/intermediates/javac/debug/compileDebugJavaWithJavac/classes

重新构建即可

Ruby相关问题

cannot load such file – sqlite3/sqlite3_native

1
2
D:/Ruby25-x64/lib/ruby/gems/2.5.0/gems/bootsnap-1.3.0/lib/bootsnap/load_path_cache/core_ext/kernel_require.rb:32:
in `require': cannot load such file -- sqlite3/sqlite3_native (LoadError)

1.install sqlite3

1
2
$ ridk exec pacman -S mingw-w64-x86_64-sqlite3
$ gem install sqlite3 --platform ruby

2.进入到sqlite3目录

1
cd D:\Ruby25-x64\lib\ruby\gems\2.5.0\gems\sqlite3-1.3.13

3.开启mingw编译环境

1
$ ridk enable

4.执行以下命令

1
2
3
ruby setup.rb config
ruby setup.rb setup
ruby setup.rb install

参考: https://github.com/sparklemotion/sqlite3-ruby/issues/228

Node.js相关问题

解析mobi文件出错

https://github.com/ctbarna/node-mobi

1
2
3
4
5
6
7
8
9
10
11
Error: LZ77 compression isn't supported... yet.
at Mobi.parse (F:\hexo\node_modules\mobi\lib\mobi.js:74:17)
at new Mobi (F:\hexo\node_modules\mobi\lib\mobi.js:20:12)
at Object.<anonymous> (F:\hexo\test.js:6:12)
at Module._compile (module.js:649:30)
at Object.Module._extensions..js (module.js:660:10)
at Module.load (module.js:561:32)
at tryModuleLoad (module.js:501:12)
at Function.Module._load (module.js:493:3)
at Function.Module.runMain (module.js:690:10)
at startup (bootstrap_node.js:194:16)

暂未解决

Ubuntu14.04下安装node.js(默认版本太旧)

1
2
cd ~
curl -sL https://deb.nodesource.com/setup_8.x -o nodesource_setup.sh
1
sudo bash nodesource_setup.sh
1
sudo apt-get install nodejs

nodejs 版本号:

1
nodejs -v
1
v8.10.0

npm 版本

1
npm -v
1
5.6.0

参考: https://www.digitalocean.com/community/tutorials/how-to-install-node-js-on-ubuntu-16-04

Markdown to static HTML

1.安装 generate-md 插件

1
sudo npm install -g markdown-styles

2.将需要的markdown文件转换成html

1
generate-md --layout github --input ./input --output ./output

3.generate-md CLI 选项

  • –input指定输入目录(默认值:) ./input/
  • –output指定输出目录(默认值:) ./output/
  • –layout指定布局
    • bootstrap3
    • github
    • jasonm23-dark
    • jasonm23-foghorn
    • jasonm23-markdown
    • jasonm23-swiss
    • markedapp-byword
    • mixu-book
    • mixu-bootstrap-2col
    • mixu-bootstrap
    • mixu-gray
    • mixu-page
    • mixu-radar
    • roryg-ghostwriter
    • thomasf-solarizedcssdark
    • thomasf-solarizedcsslight
    • witex
  • –export:将内置布局导出到目录
  • –highlight-:指定用于特定语言的自定义突出显示器模块
  • –no-header-links:如果传递此标志,则不会生成标题链接的HTML。默认情况下启用悬停链接。

网址: https://github.com/mixu/markdown-styles

Notepad++ 相关问题

安装 markdown 插件

下载后导入语言

参考:https://github.com/Edditoria/markdown-plus-plus

IntelliJ IDEA 相关问题

导入外部jar文件

File –> Project Structure -> Project Settings -> Modules -> Dependencies -> 点加号 -> JARS or directories..

Android Studio 相关问题

删除最近项目

File / Open Recent / Manage Projects..

Manage Projects

Flutter 相关问题

Running “flutter packages get” 加载太久

1
flutter packages get --verbose

参考:https://github.com/flutter/flutter/issues/15162

公众号相关问题

该网页由mp.weixin.qq.com提供

有的公众号商城显示该网页由mp.weixin.qq.com提供

链接为

http://mp.weixin.qq.com/bizmall/mallshelf?t=mall/list&biz=MzIxNjc1ODI3OA==&shelf_id=1&showwxpaytitle=1&scene=1#wechat_redirect

可以进入到公众号后台 > 功能 > 微信小店 > 货架管理(商品管理) 生成二维码或链接

微信公众平台的简称“MP”

Media Platform(媒体平台)的缩写